We come across the scenario, where we will use POSTMAN software tool to examine the working of external API. Postman is a simple GUI for sending HTTP requests and viewing responses. REST services are available in sage x3 that returns data in a JSON format. In this blog, we are going to visualize the mapping of fields from postman to x3 Rest web services.
Example: In Postman IDE,
1.HTTP
Request
— Request is the simplest way possible to make http calls.
HTTP
Request contains of Request Method, Request URL, Authorization, Request
Header, Request Body.
a.
Request Method: Request method defines the type of request to be made.
There are mainly four request methods, used for creating/updating, retrieving
and deleting data.
- POST Request — For Creating Or
Updating data - PUT Request — For
Updating data - GET Request — For
Retrieving/Fetching data - DELETE Request — For Deleting data.
Choose
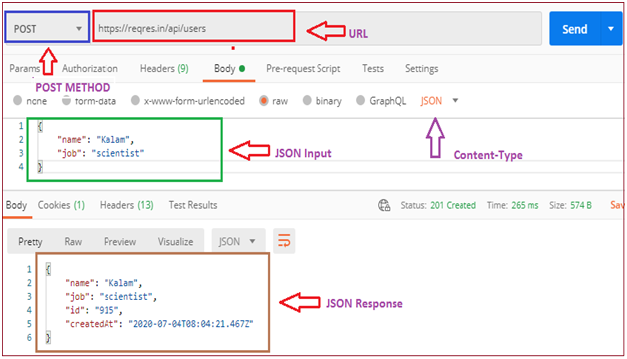
Post Method, A POST request is a method that is used when we need to
send some additional information inside the body of the request to the server.
b.
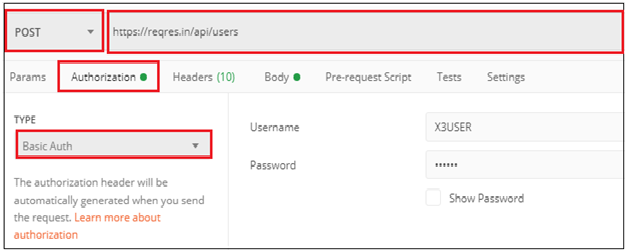
Request URL:URL to make the http request. Enter the complete URL on URL
field.
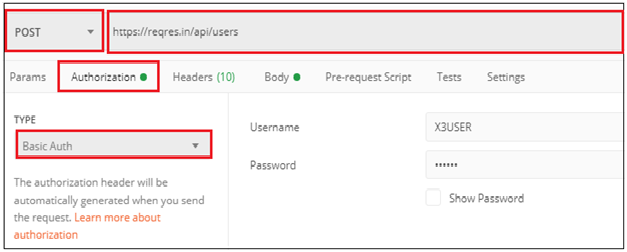
c. Authorization: An authorization token, included with requests, is used to identify the requester. Select the Basic Auth on Type field and enter valid Username and Password.
d.
Request Header: In request headers it contains key-value of the
application.
Content-Type
— A content-type describes the format of object data. Content-type, i.e.,
application/json which is used for the requests and responses
e.
Request Body: Body Field contains
the data, depends on type of request method, to be sent with request, raw form
of data is used for sending request.
{
“name”:”Kalam”,
“job” :”scientist”
}
2.HTTP Response — On click of Send Button, Response will display in JSON Format.
In X3:Create
REST Web services
Navigational Path:
All->Administration->Administration->Rest Web services
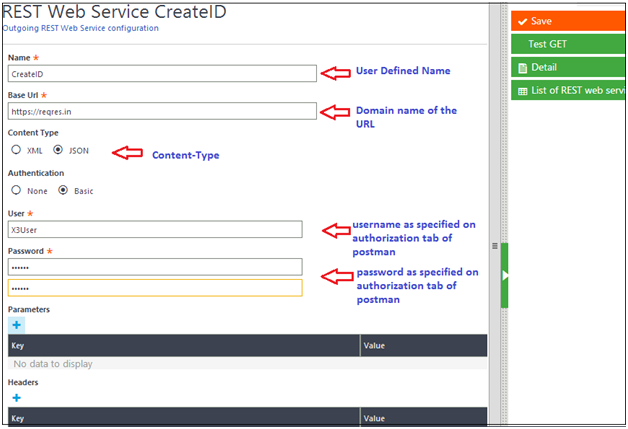
Name Field : Enter any user defined field
Base URL : Enter
the domain name of the URL
Example:
Enter only domain name: http://reqres.in
from full path: http://reqres.in/api/users
Content-Type: Choose Json
Authentication: Choose Basic Authentication and Enter credentials ,Username and
password used for authenticate the API
Parameters: PARAM tab in postman is mapped with Parameters fields in X3 as Key value Pair
In X3:Below
Code Snippet to call external API
##Declaration of Variables used in executing
RestWebservice##
LOCAL CHAR YAPI(250),YURI(250),PCOD(100)(1..100),
PVAL(100)(1..100),HCOD(100)(1..100),HVAL(100)(1..100)
LOCAL CLBFILE YMTD,YREQBODY,YRESBODY,RESHEAD(0)
LOCAL CLBFILE RESBODY
LOCAL INTEGER RETVAL
##Declaring Header ,Method and Path of URL
through Code
HCOD(1) =
“Authorization”
HVAL(1) =
‘”X3User:UserX3″‘
HCOD(2) =
“Content-Type”
HVAL(2) =
‘”application/json”‘
YMTD
= ‘POST’
YAPI
= ‘CreateID’
YURI
= ‘/api/users’
YRESBODY =
”
YREQBODY =
‘{“name”: “Kalam”,”job”:
“scientist”}’
##Call EXEC_REST_WS Method from
ASYRRESTCLI library function
RETVAL
= Func
ASYRRESTCLI.EXEC_REST_WS(YAPI,YMTD,YURI,PCOD,PVAL,HCOD,HVAL,YREQBODY,0,”,RESHEAD,YRESBODY)
IF(RETVAL=201)
INFBOX NUM$(YRESBODY)
ELSIF(RETVAL=500)
INFBOX NUM$(“CONNECTIVITY
ISSUE!!!”)
ENDIF
Explanation of
Code snippet:
Header
is specified in Key-value pair, Header should contain authorization and
content-type details.
Assign
the variable HCOD(1)- Header code of array index 1 to Authorization.
Assign
the variable HVAL(1) -Header variable of array index 1 to username and password
separated with Colon.
Assign
the variable HCOD(2)- Header code of array index 2 to Content-type.
Assign
the variable HVAL(2)- Header variable of array index 2 to application/Json.
Assign
the variable YMTD-Type of Method used to
string value “POST”
Assign
the variable YAPI -REST web service Name to ” CreateID “
Assign
the variable YURI with the remaining part of URL
just
declare Response body variable
and
Assign the YREQBODY variable to input
call
EXEC_REST_WS function from ASYRRESTCLI library with all required parameters and
will return status code as integer value which shows success or failure and
result json format is stored in YRESBODY Variable.
IMPORTANT
NOTE:
If
there is an requirement of sending Username and password directly through code
without passing in REST webservices. Explanation with scenario,
From
Login authentication screen, if it is successful then pass those credentials to
the REST web services through code, In that case Header variable should contain
Header
Code HCOD(1) as “Authorization” and
Header
Val HVAL(1) as ” Basic MTcwZWU5MmEyODOTo= “
String
“Basic” followed by BASE 64 format of Username: Password
Refer
the blog for the ASYRRESTCLI function and its parameters to be passed for the
function
“The narration of function and its parameter used to call an external/outgoing REST web service from ASYRRESTCLI library”
Few List of Status
Code and its description
1.200 -Successful request.
2.201 -Successful request and data
was created.
3.204 -Empty Response.
4.400 -Bad Request.
5.401 -Unauthorized access
6.403 -Forbidden, Access denied.
7.404 -Data not found.
8.405 -Method Not Allowed or
Requested method is not supported.
9.500 -Internal Server Error.
10.503
-Service Unavailable.
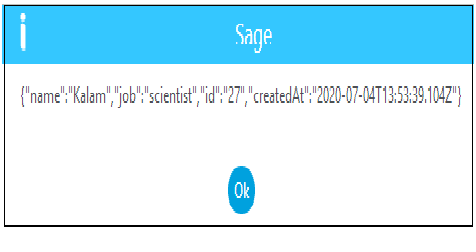
Response from API while executing the code above in X3.
This blog helps us to understand the mapping of fields from POSTMAN tool to X3 REST web services and code used to call an external API by using EXEC_REST_ES function by passing credentials in header variables.
About Us
Greytrix – a globally recognized and one of the oldest Sage Gold Development Partner is a one-stop solution provider for Sage ERP and Sage CRM organizational needs. Being acknowledged and rewarded for multi-man years of experience, we bring complete end-to-end assistance for your technical consultations, product customizations, data migration, system integrations, third-party add-on development and implementation competence.
Greytrix caters to a wide range of Sage X3, a Sage Business Cloud Solution, offerings. Our unique GUMU integrations include Sage X3 for Sage CRM, Salesforce.com, Dynamics 365 CRM and Magento eCommerce along with Implementation and Technical Support worldwide for Sage X3. Currently we are Sage X3 Implementation Partner in East Africa, Middle East, Australia, Asia, US, UK. We also offer best-in-class Sage X3 customization and development services, integrated applications such as POS | WMS | Payment Gateway | Shipping System | Business Intelligence | eCommerce and have developed add-ons such as Catch – Weight and Letter of Credit and India Legislation for Sage X3 to Sage business partners, end users and Sage PSG worldwide.
Greytrix is a recognized Sage champion ISV Partner for GUMU Sage X3 – Sage CRM integration also listed on Sage Marketplace; GUMU
 integration for Sage X3 – Salesforce is a 5-star rated app listed on Salesforce AppExchange and GUMU
 integration for Dynamics 365 CRM – Sage ERP listed on Microsoft AppSource.
For more information on Sage X3 Integration and Services, please contact us at x3@greytrix.com, We will like to hear from you.

